XML RSSSubscribe To This Site

XML RSS
Add to Google
Add to My Yahoo!
Add to My MSN
Subscribe with Bloglines

Home
Welding Projects Welding Projects
General Welding Topics Recent Updates
_forum
Welding Certification
Welding DVD sale
TigFinger Heatshield
Welder Shortage
contact us
Welding Schools
Amazin Blaze
T Shirts
types of welding
Start a Welding Biz
Welding Test Q&A
Tig Welding TIG welding test
Tig Articles
Tig Welding Pipe
Tig Basics Course
Advanced Tig Tips
Tig Aluminum Drill
Tig Settings
Pulse Tig
TIG Weld Aluminum
Welding 4130
Welding Stainless
TIG  Welding
Welding Titanium
Tungsten Sharpeners
Tig Noobs click here
Tig Supplies
Mig Welding Mig Welding tips
Uphill Mig
 MIG Procedures
MIG Supplies
Mig Videos
20 Best Mig Tips
Stick Welding 3g welding test 1
3g welding test 2
Stick Welding
Arc Welding project
Videos Video Archives
Scratch Start Tig
welding video links
Welding Videos
Welding Table
Miller Welding
 Q&A
welding steel
Welding Hats
Welding DVDs
Reviews lincoln power mig
hobart trek 180
Hobart 115v mig
Everlast Welders
plasma cutter review
How Not to weld
Auto Dark Helmets

Hobart Welding
Lincoln Mig welder
Welding Links
Chinese Tig Welder
Safety Welding Lawsuits

Welding Safety Tips
OXYFUEL Safety
Welding Curtains
Welding Tips by U
Welding Jobs
More Tips migging cast iron
Gas Welding
Welding Cast Iron
Mig Stainless
Welding Galvanized
Laser Welding
underwater welding
mig techniques
Plasma Cutting
Motorsports Welding
More Welding Tips
 TIG TIPS
more tig tips
even more tig tips
WeldingTest Q&A
WyoTech
MIG Q & A
TIG Welding Q&A
Site Map
Weld like a Girl
Miller Welding Table
privacy policy

WeldTec Torches
weld razor blades
Brazing
How to Mig Weld
Miller Helmet
Welding Pictures
Welding Techniques
ARC welding videos
Welding Aluminum
TIG Videos
 

CACTUS SUNRISE HEADACHE RACK

by John K. Dunn
(Fresno, Ca.)

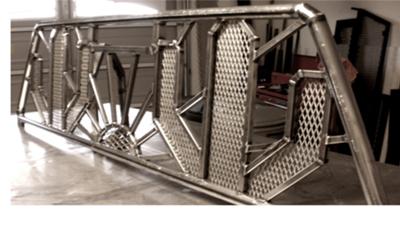
Made this headache rack for my 2010 F-150.

The Virgo(artsy-fartsy) in me said that a headache rack should not only serve it's function, but enhance the appearance of one's truck. Materials used were .120 x 1 1/2" round tube, .065 x 5/8" square tube and flat expanded metal. Spent a couple of days on the 'puter in "paint shop" and at the layout table for the design and dimensions.
Not including the "surround", 58 individual hand-cut pieces. Less than one hundred dollars in material and consumables. (Lumber-stops and tie-downs not fit yet).
Layed it out in actual size on my welding table with a sharpie, fit and welded the surround, layed it down flat and shimmed-up all the "field" pieces to center line.

To keep it straight and flat, I welded all the "inside" joints in the vertical position first, then came back and welded all the outside or "face"joints in the flat position.

No clamps or restraints needed. Came out "puss".

Thanks again Jody,

J. Dunn

Click here to post comments.

Join in and write your own page! It's easy to do. How?
Simply click here to return to welding projects
.