6g Weld Test Tips 309 TIG root
UA41 weld test

A common piple welding test is called a UA-41 and its a 2 inch schedule 80 6g weld test using carbon steel pipe.
...Its carbon steel SA106 pipe about .216" wall thickness, but its welded out using er309 stainless TIG rod.
If you are a welding school student, or an instructor,
Would you do me a favor... and print the flyer below and post it on the bulletin board?


Why a 6G weld test?
Welding codes provide for a broad qualification by passing this one single 6g weld test.
In other words, a welder can be qualified to weld both carbon and stainless steels using one test.
That is why the UA-41 test is a frequent test used for the gatekeeper test to get a pipe welding job.
Passing the UA41 or any other 6g weld test all starts with metal preparation.
The bevel needs to be accurate at 37.5% plus or minus 2.5% ...that is very important because If the bevel is too steep, the root will not go in well.
Also, all metal within about one inch of the weld joint should be cleaned to bright metal using a grinder, sanding disc, abrasive flap disc, flapper wheel, or carbide burr.
Fit up is important. The gap is specified in the welding procedure (aka WPS ...stands for welding procedure specification) and you should be provided with a copy of the WPS so read it and adhere to it.
Some test inspectors are just as interested in how you follow the WPS as they are with your welding skills.
Usually the WPS for a pipe welding test like this will call for a 1/8" (3.2mm) gap plus or minus 1/32" (0.8mm) .
The WPS also specifies the land .
For most tig welding roots, I recommend what is called a feather edge which basically means a sharp edge...no land.
There is no reason at all why you should have to deal with mismatch on a pipe test like this. Take your time and get it fit up with zero mismatch aka "high-low".
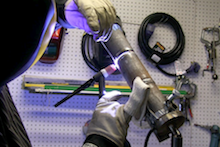
Use spacers or a welding rod to achieve a 1/8" (3.2mm) gap ..make sure both ends of pipe are taped along with the joint itself taped shut, and purge gas is on and flowing at around 15 cfh and wait for about a minute before welding the first tack weld.
for a 1/8" gap , 70 amps worked well for doing the dip technique.
I like to use the dip technique on small diameter pipe using a 1/8" gap and 3/32" rod because its slow, and lets me feed rod in a way that makes for a bit of push thru on the inside diameter.
Some welders will actually use a much wider gap and feed rod thru the gap of the top of the pipe but I have not found that to work best for me. Feeding rod from inside definitely works, but its difficult to learn and in my experience welding in the field...welding on powerplants, papermills, etc, there is often something in the way that prevents feeding thru the gap. So I like to use a technique that works well in most all situations.
I use the term "Keyhole" a lot in this video. The word keyhole is used to describe the shape of the area just ahead of the puddle. It tends to resemble a keyhole of an old fashion door.
The keyhole is key indicator of your amperage and if it gets too big, that means you need to turn the amperage down, feed more rod, feed rod more often...etc.
Cutting the tacks out is not always permitted by test inspectors so you should probably ask about that before you do it....and also, sometimes a grinder is not allowed after the tacks are feathered.
...again, these are things you want to ask about if you are in doubt.
A 2 inch schedule 80 pipe has a fairly small inside diameter. Tacks welds are going to be pretty small and some test inspectors specify just how long they can be.
That is another reason for cutting them out and remelting them to avoid a funky looking area .
Bridge tacks... A bridge tack is a tack weld that bridges the bevels without penetrating the root. they are made with the intention of grinding out when you get there.
bridge tacks are not allowed on most pipe welding tests so that is why I showed normal tack welds.
Dont forget that as you close up the root, pressure will build inside the pipe.
I like to cut an X in the tape using a pocket knife so that it can open up under pressure. It stays closed and helps to keep argon in until the joint is closed up, and then opens up under pressure.
If you forget to put a big enough vent hole, and forget to cut the X, you could wind up with a low place and it might fail inspection...
The inspection criteria for the root pass of this test is flush to 1/8" of reinforcement....So anything below flush is cause for rejection.
This is part one...The next videos on this topic will deal with the hot pass and cover pass.
see part 2 of ua41 6G weld test here
good luck welder.
see more tig welding videos like this 6g weld test video

Would you like to get free welding videos in your inbox every week?


Tig FingersThe Real and Original TIG Finger® and XL model
Stubby Gas Lens and Pro TIG kits
2% Lanthanated, CK LaYZr, Purple, more
Our Weldmonger Stubby Gas Lens kit is the Best


