Stainless Steel Tubing Welding Tips - Marine parts...But first a 30 second Video on tig welding stainless tubes

I cant take credit for any of these tips for welding stainless steel tubing and boat handrails.
These all came in an email from a fellow named Mattias from Sweden ... some great tips on welding stainless tubing rails and also for welding stainless tanks.
So here is the email I got from Mattias...
Jody,
I was thinking, maybe it is payback time. Not just to your site, but more in general.
Since I do not have my own forum, and it would take some time before someone found it if I started one. Maybe you could have use for some tricks on your site?
Here I have some tricks from two of my project types.
Stainless Steel Boat Handrails

Boat Railings of 1 inch stainless steel tubing:
When making, repairing or adjusting these railings I often have to make butt joints of the pipe. The joints have to be almost invisible when finished, so the fit-up is critical.
I use what I call a spring-loaded insert.

It is two inches of the stock stainless steel tubing that I shrink to fit inside its original. I cut it open lengthwise and remove a strip, then I crimp it in a vice so it is a bit bigger than the inner diameter of the pipe. It is now a spring-loaded insert.
Insert it in the butt joint and you get a perfect fitup! This insert serves two other purposes. It gives backing to the weld without argon, no chromium-carbides on the inside. And it gives a kind of heat-sink. You can now put more heat into the weld, get a stronger joint and not have to worry about melting through. The insert stays in the pipe and becomes a part of the joint.


I also have developed a simple fixture for fitting up the boat handrails.
Actually it is inspired by your review of the Icengineworks clamp.
My butt joint fixture is just the same stock stainless tubing, now about three inches. It is split in two equal pieces lengthwise, and two vees ground in the middle of the sides. Combine this with two hose clamps and you are set to fixture butt joints.
The ground vees are there so you can make tack welds.
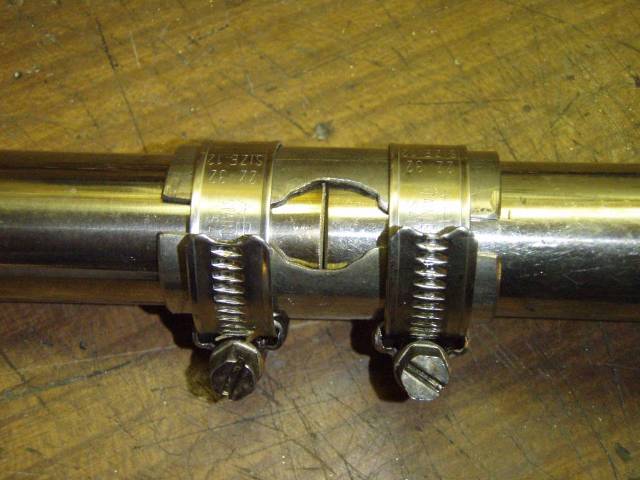
I use this when I need a good straight fit-up. Also when making complex shapes. In the pictures you see a bend with big radius combined with a 90degree bend. You can use the fixture to adjust the fit and then tighten it, and then it is rock solid and ready for welding.
I used several of these fixtures extensively on the railing in the pictures.
Usually I combine the insert with the fixture. Only when the insert cannot stay in the finished joint I use the fixture by itself.
This technique is of course usable on all kinds of tubing and dimensions, not just one inch stainless steel tubing railings.
Tip for Tig Welding Stainless Steel Tanks
Stainless tanks:
When you make stainless tanks (gas, diesel, water, septic), you always end up with corner joints welded on the outside.
Here I use copper backing when I can on the inside, way better results. And argon purging is not needed when you can back the inside with copper.
But you always end up not copper backing the last panel, if you do not have a BIG inspection hatch, and you usually do not.
For this problem I made an outside copper backing thing.

It is just two copper bars joint together to lay on the outside of the corner joint. It has just enough a wide slot to make the corner stick out to be welded.
This one also serves two purpouses. It eats up the heat from the weld area, and it creates a gas dam. The argon is pushed into the walls of the copper bars and stays around the corner joint. If you blow argon on an outside corner joint it just splits the flow.
This dam effect was not obvious to me when I first made the outside heatsink. But it became obvious on the first inch I welded with it! The weld stayed straw coloured all the way, which is otherwise hard on an outside corner.
Of course, if you only use the outside backing copper, you need argon purging of the weld on the inside!
Usually, I combine the inside copper backing with the outside.
When I make my next tank I am going to make another outside backer. Then I can weld the length of the first, switch units and put the hot one on cooling to get it ready for the next run. When I use the outside backer, I get a HAZ just as big as the gap between the two copper bars. When I try without the HAZ grows uncontrollably.
Is this kind of writeup with images usable in some way to you? A video would have been better, but I think I leave that to pros like you!
Best regards,
Mattias S.
Would you like to get free welding videos in your inbox every week?


Tig FingersThe Real and Original TIG Finger® and XL model
Stubby Gas Lens and Pro TIG kits
2% Lanthanated, CK LaYZr, Purple, more
Our Weldmonger Stubby Gas Lens kit is the Best


 Subscribe To This Site

