
Welding Distortion

 |
 |
 |
Before you can prevent welding distortion, it helps to know what causes it.
Once you know what causes it, you can limit distortion by weld sequence, fixturing or clamping, and selecting weld sequence and direction of travel.
Weld Distortion is something that can be limited to an acceptable level, not totally prevented....some amount of distortion is going to happen...it just is.
Lets dive in.
The first 2 basic concepts on welding distortion are...
1. Metal expands when it is heated and if heated enough, contracts past where it was to start.
2. The direction of travel of a weld bead makes a difference because weld metal shrinks as it cools.
The fact that metal expands when its heated and contracts when it is cooled is the fundamental thing to know about distortion.
But it is much more complex than just that.
Areas where direct heat from the welding arc is applied expand.. right?
But the surrounding area is less hot so it doesnt expand at the same rate.
Areas further away from the arc dont heat up at all and do not expand and actually resist stress from the nearby hot expanding metal.
So once the hottest are reaches a certain point, something gives.
Certain areas actually reach their yield point and distort permanently.
As the weld bead progresses along, it heats, expands, cools, contracts, and the weld metal actually shrinks.
Welding distortion looks pretty simple in the image below...but it can be complicated
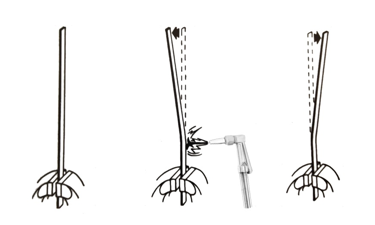
Simply heating a piece of bar stock on one side makes the whole topic of distortion seem simple.
If you place a piece of bar stock in a vise, with the piece standing up vertically, and apply heat to one side of the bar, the top of the bar will immediately move in the opposite direction of the heated side.
With only a slight bit of heat applied for a few seconds, the bar will return to its original position.
But if you apply enough heat, the bar will return PAST its original position upon cooling.
And if the heat is applied long enough to where a very large area gets hot, the bar might just remain straight.
Even as I welded on one side of a bar for the video above, I was fooled a few times because sometimes welding distortion is complicated...hard to predict.
Experienced welders get fooled all the time.
For example, I began experimenting for this video using 11ga bar stock.
I would weld a bead on one side and if I penetrated thru, I got a very different result than if I welded a bead with no penetration.
So...I chose 1/4" (.250") 6.1mm thick metal for this video instead of 11ga because the thicker metal was more predictable.
What does lacing up a boot have to do with weld distortion?
The accumulation of weld metal shrinkage stress from a weld bead can be compared to boot laces.
When you lace a boot each lace holds a bit of stress.
And if you ignore that fact, you can wind up with boots that are laced too tight at the ankle.
Each ripple of a weld bead is a freeze line and indicates a solidifaction of weld metal that shrinks upon cooling. All that shrinking adds up and that is why the direction of travel of a weld bead has a great affect on distortion.
I found this old Lincoln Video.
Watch out for Mr. Shrink...and not just when you get out of the pool...lol
here is a link to the mr. shrink video on youtube
more welding videos

Would you like to get free welding videos in your inbox every week?


Tig FingersThe Real and Original TIG Finger® and XL model
Stubby Gas Lens and Pro TIG kits
2% Lanthanated, CK LaYZr, Purple, more
Our Weldmonger Stubby Gas Lens kit is the Best


