
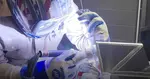
Aluminum Welding Test 1g .063" 6061 t6
see more tig welding aluminum videos or go to the main TIG welding page

...Introducing the New WeldMonger Challenger TIG kit that includes the most frequently used Cups.


Here are a few tips I have learned over the years for passing a 1g aluminum welding test on .063" 6061 t6 material.
#1 Remove all oils, inks, tape residue, etc with Acetone
A good acetone wipe to remove all oils and residue helps a lot.
Porosity is the main cause for failure on aluminum butt joints so eliminating all potential causes for porosity is good step.
Aluminum more prone to porosity than carbon or stainless steels...and oils and residues are prime causes of porosity.
#2 File the edges to be welded.
I learned this one thru lots and lots of testing.
When I worked for a major Airline, I tested welders on all metals and sent the test welds to the NDT inspection department. There was an occasion where we had trouble getting aluminum tests welds to pas x- ray so we designed an experiment to identify the variables most likely to cause failure.
Filing the sheared edge of the aluminum welding test pieces made a bigger difference than most other things.
AWS D17.1 limitations for linear porosity are more stringent than for scattered porosity so it makes sense that the contaminants found along the sheared edge of the plates might cause excessive linear porosity.
Use a new clean file dedicated to aluminum and when you think you have removed all the rough sheared surface....file a bit more just to make sure.
Trust me...it makes a huge difference on the test results.
#3 Use a new and clean fine bristle stainless wire cup brush
Scotch Brite discs, sanding discs and other abrasives can embed grit or smear polishing compounds into the aluminum and cause porosity.
But a clean stainless steel brush will not embed anything.
I recommend using a fine cup brush with an angle grinder.
After filing and wire brushing, another wipe down with acetone will remove any residue.
#4 Place in a fixture and make a tack weld on each end
There is no requirement to use a fixture for this test but it is advised.
Aluminum test plates will become saturated with heat to the point where everything acts differently.
Some type of fixture is very helpful.
The fixture used in the video was made in one work day out of carbon steel.
It has the capability for argon backing gas but I didn't use argon for this test weld.
While there are some situations where argon backing helps, it is possible to weld an x ray quality joint without argon backing gas.
#5 Settings used for this 1g Aluminum Welding Test on .063" 6061 t6
machine amperage was set to around 85..actual amperage used was 72 amps.
I used advanced square wave
AC frequency was set to 100 hz
AC balance was set to 30% cleaning
#5 cup using 14 cfh argon
3/32" (2.4mm) 2% lanthanated electrode
1/16" (1.6mm) 4043 filler metal

You might like these
Aluminum Welding Training on your own - just you and your tig machine
The best Aluminum Welding Training you can get on your own - How to Get better at Tig Welding
Welding Aluminum with Tig
Videos on Tig Welding Aluminum and learning how to tig weld
Would you like to get free welding videos in your inbox every week?


Tig FingersThe Real and Original TIG Finger® and XL model
Stubby Gas Lens and Pro TIG kits
2% Lanthanated, CK LaYZr, Purple, more
Our Weldmonger Stubby Gas Lens kit is the Best


