
MIG welding wire speed affects on penetration

Basic Mig welding settings are made up of 2 main settings...
1.Voltage
and
2. Wire speed.
wire feed speed controls amperage...
But that doesn't mean you can just leave the voltage alone.
Voltage needs to be balanced with wire speed for an efficient metal transfer.
kinda like setting the fuel mixture on a carburetor.
check out the newest products at the weldmonger store
more mig welding videos showing penetration tests
downhill mig welding vs uphill
mig basics avoiding lack of fusion
If Wire Speed determines amperage, then what does voltage do?
Voltage determines arc length ( distance between the tip of the wire and the puddle) and also affects bead width.
But voltage also has an effect on the efficiency of the wire melting off.
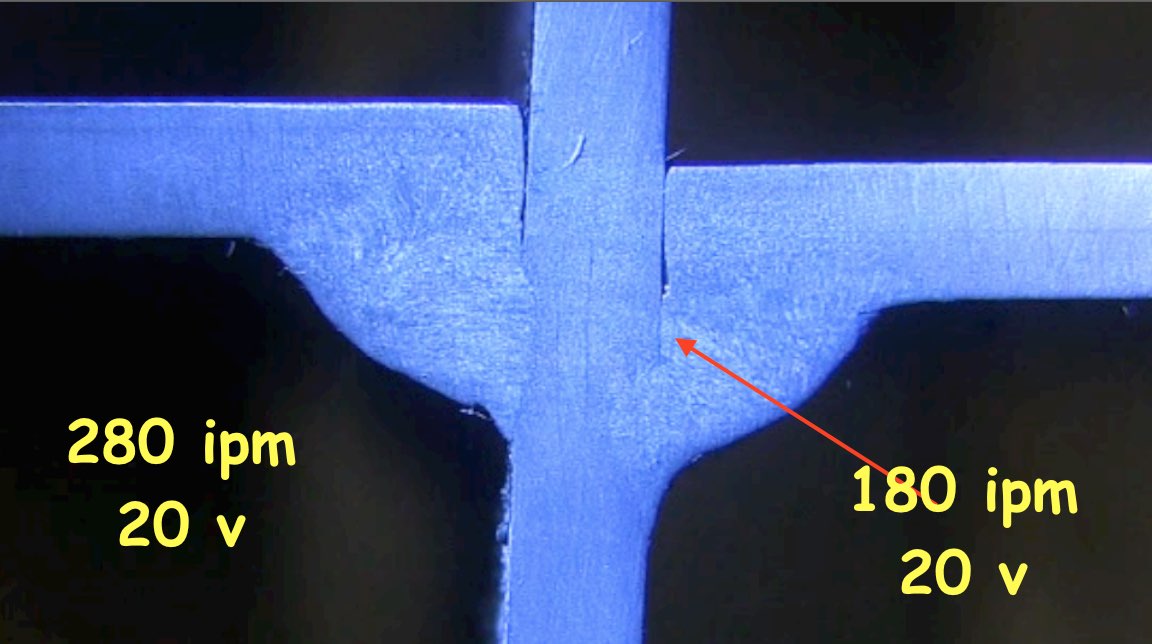
In this video, I lowered wire feed speed drastically to show that when voltage and wire feed are out of balance, penetration suffers.
It might seem logical to some that lowering wire feed would increase heat input because of the lower travel speed and due to a longer arc time during the short circuit mig cycle.
And that might hold true to a certain extent and in certain wire feed ranges...
But it didnt seem to hold true at all on the Tee joint welded in this video.
Keeping voltage the same but lowering wire feed speed caused a lot of spatter, and definitely decreased penetration.
Lowering wire speed for the outside corner weld
Mig welding an outside corner in 11 gauge steel usually involves melting off the corners into the weld...so since you have extra metal being added to the weld, lowering the wire feed speed seemed to help.
But the main benefit for me in this video was being able to see where I was going.
Fast travel speeds on an outside corner make it hard for this old timer to see the joint sometimes.
By lowering wire feed speed and using a forward and back technique, the light was constantly changing up and that let me to see the joint better.
that is why I rarely just drag a mig puddle in a straight line.
Its not because I think using some sort of torch manipulation makes a better weld. But it does help me to see everything better.
outside corners take less heat than Tee Joints
Wire feed charts on mig machines always seem a bit high to me ...
So I typically set wire feed to about 10 percent lower than the recommended settings on the machine chart.
If there is no chart, I just use a piece of scrap metal and go for a nice bacon frying sound that wets in good.
I lowered the wire feed speed drastically for the outside corner joint and for the Tee joint just to exaggerate the effects for the sake of the video and to hopefully learn something.
Macro Etch Test
A macro etch test will typically require several cuts to examine cross sections of a weld.
for the sake of time, I just made one cut in the middle of the weld.
After cutting, a 100 grit sanding wheel followed by a red roloc scotch brite disc was all it took to get the weld smooth enough to etch and reveal penetration.
The smoother you can get the surface, the better it responds to etching.
I used a stainless steel passivation solution for this video, but loctite rust remover works just fine too.
Some concrete clean& etch solutions like Seal-Krete clean n etch will also etch carbon steel well enough to test penetration.
see more mig welding videos

Would you like to get free welding videos in your inbox every week?


Tig FingersThe Real and Original TIG Finger® and XL model
Stubby Gas Lens and Pro TIG kits
2% Lanthanated, CK LaYZr, Purple, more
Our Weldmonger Stubby Gas Lens kit is the Best


