Mig Welding Basics Part 1
Updated video setting up a primeweld mig180

This is Mig Welding Basics part 1
Usually, my videos are about tips and tricks during a project or some aspect of a welding position or joint.
This is kinda different.
In
this Mig Welding Basics series, I am going to try to start a ground
zero and do an ABC…123 step by step instructions that should help any
beginner or intermediate welder improve their mig welding skills.
see part 2 of this series on MIG
learn more about the MIG 180 at weldmonger.com


You might like these
Vertical Uphill Welding Technique
A Video Explaining a Vertical Uphill Welding Technique

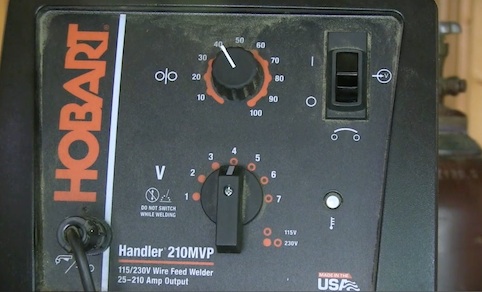
For this Mig Welding Basics video, I chose a Hobart 210 mvp mig welder because it is very basic. It even has tap settings for voltage.
The Hobart 210 mvp only has 2 basic settings…voltage, and wire
speed….and thats really all you need for learning how to mig weld.
Later
on in this series, I plan on using other mig welders with more advanced
settings like burn back, hot start, crater fill, inductance, and even
pre/post flow settings.
For learning Basic Mig Welding, I recommend a basic welder like the Hobart 210 mvp because...
- Its a multi voltage welder and that means if you currently only
have 115 volt power, you can get started and then swap over later once
you get your shop or garage wired for 230 volt.
- its a very capable welder that can also be used with a spool gun for aluminum welding
- has a great arc using either 75/25 argon/c02 or pure CO2
- its somewhat portable. I mean its a heavy little welder, but I can easily throw it in the back of my jeep
Here are some mig welding basics to pay attention to no matter what kind of mig welder you use.
- .030" wire is probably the most versatile and er70s6 is probably the easiest type to find. The 6 on the end indicates it has a high silicon content. Silicon helps to float impurities to the top of the weld and that is what those brown islands are on top of a bead. But er70s6 is not the only option. If your metal is clean you don't really need er70s6....but it won't hurt to use er70s6 on clean metal either.
- Or for mig welding really thin sheet like auto body panels, the added silicon can cause a bead that becomes brittle if you use a hammer and dolly. er70s3 does not have as much silicon content and in my opinion is a better choice for welding auto body panels.
- Set the tension on the wire spool just tight enough to prevent backlash…any tighter than that and it can create wire feeding problems.
- use the right size and type of drive rollers for the size and type of wire. In other words, use the knurled groove for flux core wire and use the smooth groove for hard solid wire….and use the correct size too. Using too large a drive roller can cause the rollers to slip and that makes for inconsistent arcs.
- set the tension on the drive rollers either according to manufacturers recommendations, or use a glove to pinch the wire while you press the gun trigger. I use a glove method personally, and set the wire feed tensioner to the point where I can slow the feed down but not completely stop it. I feel like that is about the right tension to prevent slipping as well as not wear out the drive rollers prematurely.
- make sure the polarity is right. This might seem obvious but lots of mig welders are set up from the factory on DCEN polarity because they come with flux core wire. Solid wire with gas requires DCEP electrode positive. Self shielded flux core wire needs DCEN.
- Make sure the contact tip is flush or slightly protruding from the end of the nozzle. If your nozzle is not adjustable, you might have to buy a few longer contact tips. If those are not available and you don't mmd altering your gun nozzle, you can just trim it back using a hacksaw, lathe, or grinder. Nozzles are pretty cheap so you might want to buy an extra one to trim.
- make sure you have a good ground. A good solid ground
is more important with mig welding than other types of welding. If you
intermittently lose contact , your welder keeps pumping out wire and
thats where you get a stutter, or a false start. That sputter can make you think your wire speed settings are wrong.
I use a short piece of bare braided wire from an old tig torch or welding lead and clamp it on a clean surface of the table or better yet, directly to the part I am welding. - how much gas do you need? Most manufacturers err on the side of caution and recommend flow rates greater that what is needed. I can easily get by using 15-20 cfh with this hobart 210. It depends largely on the size of the nozzle. I have other mig welders with a much larger nozzle and I often use 20-25 cfh on those welders. High flow rates do not necessarily make for better welds. It just means you will run out of gas quicker.

Using the chart on the inside panel of the welder, I set the voltage to a 4 and wire speed to 40. ( I would guess that the 4 setting is around 18 volts and I measured the wire and a setting of 40 is around 240 ipm)
There are lots of different mig welding techniques that work but I usually use a technique that traces the puddle.
A
series of cursive E's provides for a nice even travel speed and keeps
the arc mostly on the leading edge of the puddle. You can also just
move the arc along steadily without any manipulation if that works
better for you.
The chart settings of 4 and 40 are close. No surprise there. Hobart would be really dumb to do otherwise .
Later in the series , we will talk about how to set a welder with no chart. no numbers, no dial.
see part2 of MIG welding basics.
see more mig welding videos

Would you like to get free welding videos in your inbox every week?


Tig FingersThe Real and Original TIG Finger® and XL model
Stubby Gas Lens and Pro TIG kits
2% Lanthanated, CK LaYZr, Purple, more
Our Weldmonger Stubby Gas Lens kit is the Best


