Miller Welds new Dynasty 350 TIG inverter is Freakin Sweet!

Miller Welds dot com is a good place to find information about the Miller Dynasty 350 inverter TIG machine.
I recently had a chance to do something experimenting with the Dynasty 350 on some aluminum. The results are interesting....
In Aerospace welding, as well as other industries such as mold making, there are many jobs where precision weld placement is critical and can make all the difference.
For Aluminum castings where precision is critical, The Miller dynasty 350 machine performed exceptionally well.
One such job was on an aluminum housing made from a357 cast aluminum and had a damaged area directly adjacent to a pressed in bronze bushing. Normally, the bronze bushing would have to be removed and replaced after welding because of the inability to control the arc precisely and because of subsequent distortion of the bushing hole.
Because the Miller Welds dynasty 350 is equipped with versatile arc shaping capabilities, it allowed weld repair of the damaged area without removing the bushing and saved labor while making the part serviceable quicker.
As a welding power source producer, I know it is possible to become biased and a little too enamored with your own product. Since I am an end user with no “dog in the fight”,
I thought you might be interested in some test results from an unbiased user:
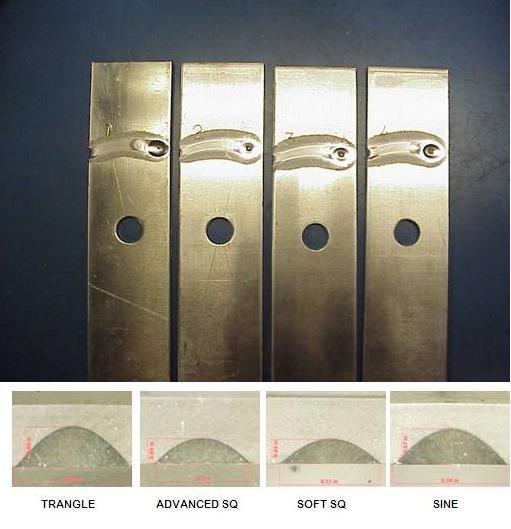
So… I ran some welding tests to determine the different weld profiles produced in .125” thick 3003 H14 aluminum using Miller Welds Dynasty 350. The material was only wiped with acetone with no other chemical or mechanical cleaning done.
The test was set up using the parameters listed below where the only variable changed was the alternating current (A/C) waveform.
As you know, the Miller dynasty 350 is capable of producing:
Triangle wave form
Advanced Square wave
Soft Square wave
Sinusoidal wave form (like the old school tig welding machines)
In this experiment, The GTAW process was automated using a fixed torch holder that maintained a .063 arc length while travel speed remained constant using a rotating positioner device.
No heat sink was employed. No filler wire was used out of concern for skewing the results.
Travel speed was intentionally intended to simulate typical manual welding speed (as was determined by manually welded test joints of the same material) and was calculated to be 7.85 ipm
One weld sample was produced using each waveform. Amperage was chosen that would not completely penetrate the material at the point where sectioning was to be performed to reduce the possibility of liquation cracking or centerline cracking that is common in autogenous full penetration or near full penetration aluminum welds.
The welds were all sectioned exactly one inch from the starting point in an area predetermined to not be fully penetrated.
All of the welds did eventually fully penetrate at point away from the sectioned area before the arc was terminated due to heat saturation.
As you can see in the cross section photos that were polished and etched, There is a considerable difference in weld profiles achieved just by selecting different waveforms and not changing anything else.
The most penetration was achieved by triangle waveform as was expected. What I did not expect was that the sinusoidal waveform achieved the second greatest penetration.
The bottom line is that having these tools in your arsenal as an aluminum tig welder, gives you many more options in ways to get the job done.
learn more about welding aluminum
Would you like to get free welding videos in your inbox every week?


Tig FingersThe Real and Original TIG Finger® and XL model
Stubby Gas Lens and Pro TIG kits
2% Lanthanated, CK LaYZr, Purple, more
Our Weldmonger Stubby Gas Lens kit is the Best


 Subscribe To This Site

