Multimatic 220 AC/DC Mig Welding Tips and Techniques

In this video, we are testing out the mig welding function on the Miller multimatic 220 AC/DC welder.
 |
 |
 |
This Multimatic 220 welder came with a small 2lb spool of .030" er70s6 wire so that is what I am using for this video.
.030" is a pretty good all around wire size for light duty welding because it is small enough to weld thin auto body panels, but also works well on 1/4" thick steel.
.035" might be a better choice if I mostly welded 3/16"-1/4" thick steel but .035" is not as smooth using the lower voltage and wire speed settings needed for thin sheet metal.
I am using c25 shielding gas which is 75% argon and 25% Co2.
sometimes pure Co2 is used but in the USA, C25 is the most widely used gas for short circuit mig welding.
push vs pull using the multimatic 220 auto set mode
There are no shortage of opinions on push vs pull when it comes to short circuit mig welding.
So using the auto set settings for 1/4" thick steel, I pushed one and puled one.
One cut and etch test is worth a thousand expert opinions.


What is Short Circuit Mig?
If you are not in the mood to read about short circuit mig, just know that short cirucit mig is the most common type of mig welding for welders this size and smaller.
Short circuit mig welding is very versatile and can weld thin auto body panels as well as much thicker metals in all positions.
In the electrical trade, a short circuit is usually a bad thing.
But in mig welding, short circuit just describes the way metal transfers from the wire into the weld puddle.
There are 3 main ways metal transfers from the wire to the puddle.
- short circuit
- spray transfer
- globular
With short circuit mig, the wire actually touches and goes in and out of the weld puddle rapidly.
while the wire is touching and melting into the molten puddle, it is short circuiting.
Spray transfer uses much higher current, is a much hotter process, and the metal transfers into the weld puddle by small droplets...the wire never really reaches the puddle.
Globular transfer means the weld metal transfers across the arc in large droplets. most often using 100% co2 gas.
globular transfer has a lot of drawbacks...spatter, position limitations, etc.
I havent seen everything, but I have been welding a long time, and have worked in and visited a lot of shops...and I have not seen globular transfer being used regularly.
Setting voltage and wire speed
there are 3 main ways to set voltage and wire speed on the Multimatic 220.
- Use the chart on the machine and set voltage and wire speed manually
- Use the auto set mode and select thickness of metal
- Get a piece of scrap and set voltage and wire speed until if looks, feels, and sounds right.
What about vertical uphill welding?
Most modern mig welding machines from Miller, Lincoln, Esab, Miller,
or Hobart all have a settings chart on the wire feeder cover door.
And those settings are usually pretty good but they definitely are hot and intended for use on flat and horizontal fillet welds.
Some
machines like this Miller Multimatic 220 AC/DC, and also the Esab Rebel
line, also have graphic displays where you can simply select a
thickness and you automatically get similar settings like on the chart.
But again, those settings are intended for flat and horizontal fillet welds.
So how do you set the machine for vertical uphill welding?
Easy,

I found that just choosing 2 thicknesses below the recommended settings worked really well.
And If your application can stand a more convex weld ….then using a setting that is one thickness less could work out fine too.
Also, The wire speed recommendations on the machine charts and also the auto set settings seemed a bit high to me so I found that increasing voltage 2 tenths balanced things out
That said, I do use the chart as a guide…its usually helpful and a quick way to get in the ball park.
If I dont have a chart, I usually just grab a piece of scrap metal and go from there.
Even without a chart, It only takes a few minutes to dial in most any mig welder …
because I know that my voltage range for short circuit mig is realistically around 14-24 volts with c25 gas, depending on the machine and wire diameter.
14 volts for the thinnest sheet metal with .024” wire …and 23-24 volts for the thickest metal I would weld with short circuit mig.
Voltage settings down around 14 are mostly used for sheet metal. For 1/8 and thicker, I am usually in the 17-23 range.
In fact unless I am welding an open root on a test plate or pipe, I am often in the 19-23 volt range.
19 volts will handle most vertical uphill on 3/8” and under….and 23 volts is good and hot for flat, horizontal and downhill for general fab.
Wire speed is another story. and even though wire speed has the biggest effect on amperage, voltage needs to be high enough for an efficient transfer of metal.
All the textbooks state that wire speed is what controls amperage but you obviously you cant max out the wire speed with super low voltage setting. It just won’t work.
Its almost like a carburetor. And getting the right mix of air and gas for an efficient burn.
A MIG Knuckle is a back of the hand heat shield that is far more effective at blocking heat than those aluminized ones.
It can even be used as an arm pad for any type of welding where your need to prop on hot metal
I have always referred folks to this resource for mig welder settings.
This is a link to miller electric website and it is a quick mig setting calculator
Miller weld calculator
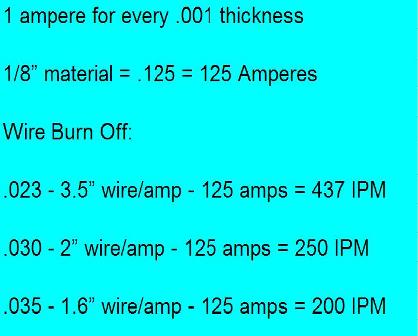
also, this Quick cheat sheet below can get you in the ball park quick …it uses 1/8” steel just for an example but it definitely works on thicknesses up to about 1/4"

Would you like to get free welding videos in your inbox every week?


Tig FingersThe Real and Original TIG Finger® and XL model
Stubby Gas Lens and Pro TIG kits
2% Lanthanated, CK LaYZr, Purple, more
Our Weldmonger Stubby Gas Lens kit is the Best


