Titanium Welding Test - 1G .046" with and without pulse
Got a Titanium Welding test in your future? or other aerospace welding test?
Watch this video on a 1G .046" thick 6AL4V test welded with ERTI-2 .045" filler wire.
not interested in Titanium welding test? here is a video of stainless and aluminum using the ABOM79 test fixture
and here is the link to download the drawing for ABOM79 weld test fixture

Everything shown in this video not only works on Titanium, but also works well on other aerospace alloys like 4130 chromoly, 17-7 stainless, inconel 718, and haynes 188....and can help you pass a test on any steel, nickel, or cobalt alloy.
To pass a titanium welding test, there are a handful of steps that make more difference than everything else combined.
Because Titanium is what is known as a reactive metal, it requires better gas shielding than other commonly welded metals like carbon or stainless steels.
And there are even discoloration limits on most any titanium welding test.
Here are the 3 most important things to help you pass
- Proper gas shielding from the cup as well as the back side of the weld
- cleanliness of everything. the test plates, the filler wire, and the fixture
- proper travel speed
see more tig welding videos
Lets break each one down
click here to learn more about the Jazzy 10 cup
learn more about the new BBW with threaded brass insert

Proper gas shielding
Lets start with the cup.
There are several type cups that can work for titanium and there are also things called trailing shields that attach to the cup or torch.
But trailing shields can complicate things because they usually require a separate argon line...and with titanium, you are often purging the backside or inside so with a trailing shield, you need at least 3 flowmeters.
They work great for pipe, but for a test in a fixture a trailing shield is not necessary unless specified by a procedure.
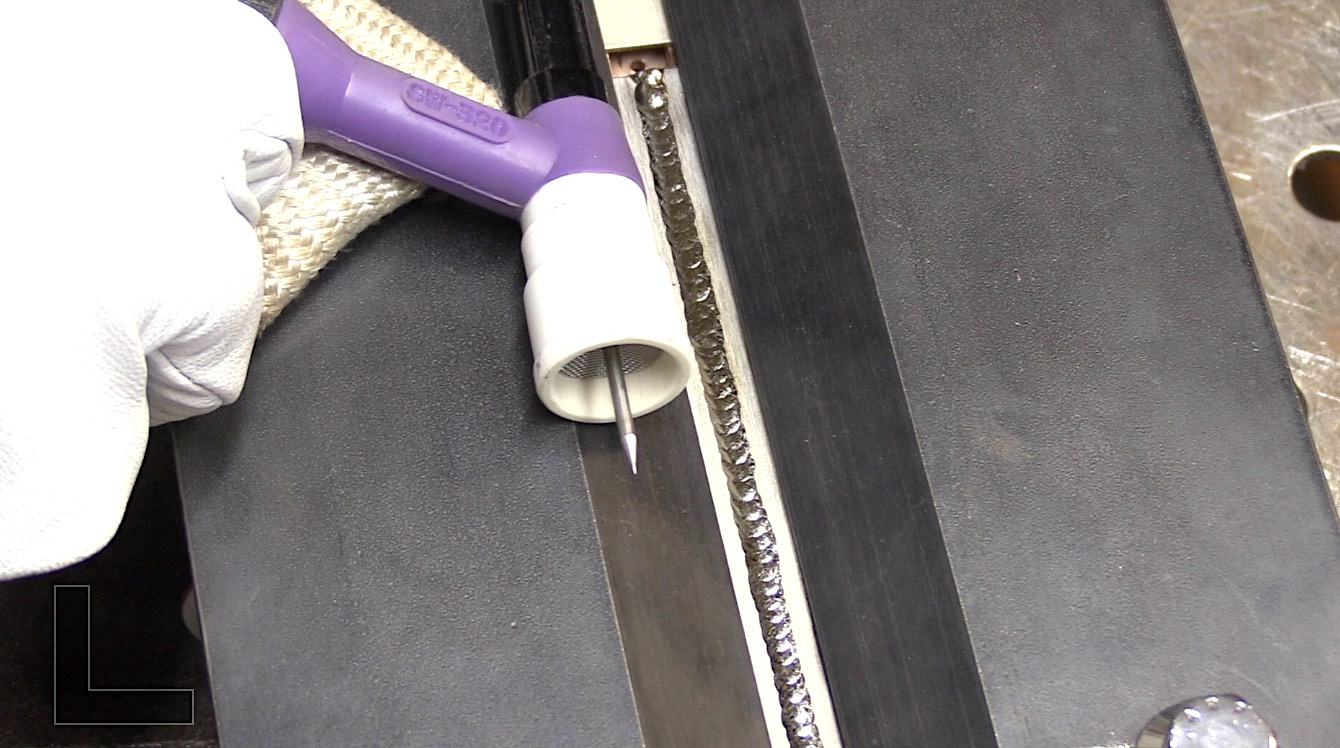
I used 2 different cups for this video...a Furick Jazzy 10 ceramic, and a Furick BBW clear cup . The Jazzy 10 required about 22 cfh of argon and The BBW is a #19 cup and requires about 40cfh.
The benefits of using a large cup are threefold...
1. a larger argon envelope means less discoloration
2. the larger argon envelop also makes it less likely to contaminate the hot tip of the wire
3. the longer stickout provides a better view of the puddle
The fixture used was custom made for me by my friend Adam Booth aka
ABOM79 on YouTube.
This type of fixture is very commonly used in the aerospace industry for testing and not only provides argon shielding to the back side of a butt joint, but also provides a heat sink that also helps with discoloration.
I was able to get a silver weld ..even with the jazzy 10 cup.
For any Titanium Welding Test, you need a dual flowmeter
There is no getting around it. A dual flowmeter is the best way to ensure the right flow for purge gas.
The 3 C's Clean, Clean, Clean
Clean test plates, Clean filler wire, Clean Gloves, Clean Fixture.
Everything should be clean.
The way the test plates are cleaned has everything to do with a pass or fail when the test is X rayed.
Porosity is the number one cause for failure on almost any Butt Weld Titanium Welding test
So what is the best method for cleaning Titanium test plates to avoid porosity?
First, a thorough wipe down with Acetone is a good idea to remove any oils. Oils cause porosity and using a wire brush or abrasive can just smear oils.
Some companies have even learned that using Reagent grade Acetone makes a difference in x ray results.
After the Acetone wipe comes cleaning the edge. This is one of THE most important steps.
Since limitations for linear porosity are much stricter than for scattered porosity, cleaning the edge is super important.
A new clean file works but you could also use a machinists deburring tool or even a clean carbide burr.
After the edge is prepped, next is cleaning the surfaces near the edge that will be welded.
There are many ways that can work and there are a few I would NOT recommend.
One method I would NOT use is Roloc disc scotch brite pads. especially the RED ones.
I have personally seen many failed x ray tests as a result of using Red Scotch Brite discs. and some of those failed tests were on alloys that hardly ever had a porosity issue.
The best results in my experience came from using a fine bristle wire cup brush on a slow speed motor. Even a cordless drill can work ok.
Once the metal is clean, another acetone wipe is needed.
now give the fixture a thorough wipe down with acetone ...BEFORE putting the test plates in the fixture. squirt the acetone on the rag...dont douche the fixture. you dont want liquid acetone seeping into the purge holes.
And dont touch the weld area of the plates with your bare fingers either.
either use nitrile gloves, or just hold the plates away from the weld area.
Next, wiped down the filler wire with acetone and make sure your welding gloves are clean...preferably new. A clean cotton glove on the filler wire hand is one method to avoid contaminating the filler wire.
Technique and Travel speed
The reason travel speed is important is ...
1. to avoid excessive grain growth
2. to avoid porosity
a super slow travel speed can contribute to grain growth.
but using too fast a travel speed can contribute to porosity by not allowing enough time for any possible contaminate to outgas.
(again, if everything is cleaned properly, there should be no contaminates to outgas.)
somewhere around 4-5 inches per minute seems to be ok on a .046" thick butt joint.
The technique is much like you would use for stainless except that the edges of a titanium puddle are very sticky.
I try to aim for the middle of the puddle with my filler wire to prevent it from sticking
Pulse settings vs straight current
I compared welding with and without pulse and used the Miller Electric Pro settings for the pulse settings.
pulse frequency was set to 100hz
peak pulse time was set to 40%
background current was set to 25%
What is the Rule of 33?
pulse settings can be confusing and unless the process is automated, there can be very little difference in a wide range of settings.
I like to start with what I call the "rule of 33"
33 pulses per second
33% pulse time
33% background
Why? because its a very good starting point and its easy to remember.
33 pulses per second is not as hard on the eyeballs as 10-20 pps and it still provides puddle control and puddle agitation.
I usually start at 33 pps but often experiment with 50-100 pps
Is pulse really necessary?
in a word...No.
Can it help for certain situations? Yes
For automated applications where travel speed is fixed, pulse tig can really provide benefits.
For manual tig welding, I find that when welding on or near an edge, pulse settings just like I used in this video can be very helpful.
Discoloration of Titanium
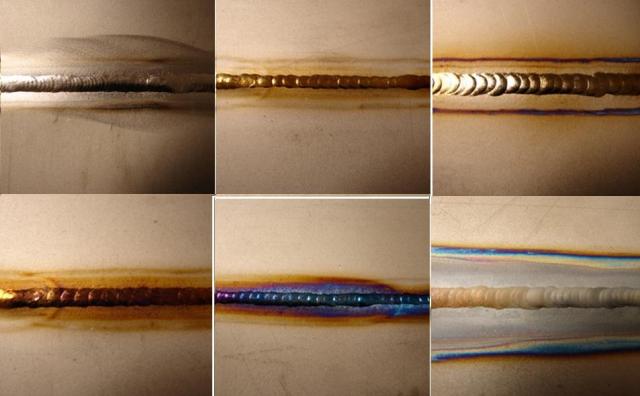
The goal is to keep it silver. But the amount of discoloration allowed depends on code specifications and application.
The last picture on this chart is severely discolored and chalky. its pretty much scrap.
More about Aerospace Welding Certifications
A 1G welding test in a thickness range from ..020" to .063" (0.5mm to 1.6mm) is a very common test for becoming certified in the aerospace industry.
Since a .046" thick 1G titanium welding test only qualifies for flat position and with limits on thickness, this test is usually just a beginning.
More often than not, aerospace welding employers require multiple test joints. Sometimes 15-20 or more test joints.
AWS D17.1 is the governing specification and it replaced 2 old mil standards.
mil std 1595a and mil std 2219.
D17.1 requires a different test for each metal group....and Titanium alloys is one of those groups.
in addition to a 1G plate test, it is common to be required to weld a Tee joint fillet weld....often in the 2F position but sometimes other positions.
That is often a baseline certification for each metal group.
AWS D17.1 metal groups
there are 8 metal groups listed in AWS D17.1 and there are sub groups within 3 of those groups.
The 8 different groups of metals listed in AWS D17.1 are
1. Carbon and low alloy steels. 1b. heat treatable alloy steels
2. Iron based stainless steels 2b. precipitation pardonable stainless steels
3. Nickel based alloys 3b. precipitation pardonable nickel based alloys
4. Aluminum alloys/ heat treatable aluminum alloys
5. Magnesium alloys
6. Titanium alloys
7. Cobalt alloys
8. Other alloys that dont fit into the first 7 groups of alloys like copper alloys, refractory metals, etc.
each different metal in this category usually requires a separate certification test..but the Engineering Authority can also affect this.
Certification vs Qualification
These 2 words are often used synonymously.
But there is a difference.
A certification is a piece of paper documenting that a welder passed a test.
In the aerospace welding world, qualification can require additional documentation in order for the welder to be qualified.
Qualification on parts
there is also a provision in AWS D17.1 to qualify welders on parts instead of using standard plate and tube tests.
In my opinion, this is an under utilized provision.
Especially in the aerospace repair industry where the scope of welding often does not resemble the tests given.

Would you like to get free welding videos in your inbox every week?


Tig FingersThe Real and Original TIG Finger® and XL model
Stubby Gas Lens and Pro TIG kits
2% Lanthanated, CK LaYZr, Purple, more
Our Weldmonger Stubby Gas Lens kit is the Best


