Take advantage of our Free Welding Guides loaded with Video links

How to Weld Vertical up

How to Weld Vertical up with MIG (short arc mig)

How to Weld Vertical up with Dual Shield Flux Core

You might like these
Uphill Welding with 7018
Video about Uphill Welding with 7018 rods
General principles on how to weld vertical up on Carbon Steel using MIG, Stick, or Flux core.
Welding vertical uphill refers to joining two metal pieces in a vertical position, where the molten filler metal flows upwards against gravity.
Gravity is one of the main things that makes vertical up a bit more challenging compared to welding in a flat or horizontal position, because gravity tends to pull downward on the molten puddle causing it to sag.
But with the right machine settings, technique, and metal preparation, gravity can be overcome and a vertical uphill weld can look just as good as any other position.
Here's a general guide on how to weld vertical up:
- Safety precautions: Before you start welding, always make the effort to wear proper safety gear, including welding gloves, helmet, and protective clothing. Also, make sure you're working in a well-ventilated area to avoid inhaling harmful fumes.
- Prepare the base material: Use a wire brush or grinder to achieve a clean surface that is free of mill scale or other contaminants. Bevel the edges if necessary to create a V-groove or U-groove joint, which will provide better penetration and strength.
- Set up the welding equipment: Choose the appropriate welding machine, electrode, and shielding gas for your specific application. Consult the welding reference charts or follow the recommendations of the electrode manufacturer for the correct settings.
- Positioning: Secure the workpiece in a vertical position. You may need to use clamps or magnets to hold the pieces in place, ensuring they won't move during the welding process. Make sure the joint is accessible and visible for proper electrode placement.
- Electrode angle and travel direction: Hold the electrode using a slight push angle with the electrode or wire pointing upwards. Aim for an angle of around 10-15 degrees uphill to help direct the molten metal into the joint. (for vertical up, travel direction should be upwards, against gravity.
- Arc length and speed: Maintain a consistent arc length between the electrode and the base material. With Stick welding, the arc length is the distance between the molten puddle and the tip of the core of the stick electrode. But with mig welding the arc length is measured from the the tip of the wire. This distance helps control the puddle. Control your travel speed to ensure proper penetration and fusion without excessive buildup or undercutting.
- Welding technique: A simple technique that works well is a series of upside down V's. This keeps the arc moving on the leading edge of the puddle and helps with penetration into the root of the joint. For stick welding this motion can be very small and subtle.
- Manage the weld pool: As you move upwards, pay close attention to the weld pool as well as the edges (toes) of the weld. Control the size and shape of the pool by adjusting the angle, travel speed, and manipulation of the electrode. Maintain a consistent rhythm to achieve even and consistent beads.
- Pause and cool: Occasionally pause when welding a practice piece to allow the joint to cool slightly. A heat soaked practice piece will weld differently and not provide the right practice.
- Repeat and complete the weld: Continue welding in a vertical up direction until you reach the end of the joint. Repeat the process if multiple passes are required. Ensure proper fusion and penetration between layers by cleaning the surface before each subsequent pass.
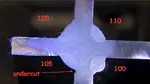
- Post-weld cleaning and inspection: Once the welding is complete, remove any slag or spatter from the weld bead using a wire brush and/or chipping hammer. Inspect the weld for any defects, such as cracks, undercutting, porosity, cold lap, etc.
Remember, mastering vertical up welding requires intentional practice.
Simply running bead after bead with no thought to improving technique does not help and can actually build bad habits.
Intentional practice means examining each bead and making an intentional effort to correct any faulty techniques.

Your second block of text...
Would you like to get free welding videos in your inbox every week?


Tig FingersThe Real and Original TIG Finger® and XL model
Stubby Gas Lens and Pro TIG kits
2% Lanthanated, CK LaYZr, Purple, more
Our Weldmonger Stubby Gas Lens kit is the Best


