Tips and Techniques for Taking a Mig Welding Certification Test

When mig welding tests are given using bare wire short circuit mig welding, the test is often done using 3/8” A36 structural plate. A 37.5 degree bevel is used for an included angle of 75. A 1/8” root opening with a 0-1/16” land is also common. (the land is a flat area filed or ground on the sharp point of the beveled test plate).
If an all position welding certification is needed then a 3G (vertical) and 4G (overhead) tests are both required.
By passing these 2 positions, the welder is usually qualified to weld in all positions on plate and on pipe equal to or greater than 24” in diameter. (for most AWS codes)
On an earlier page about setting the wire speed the same even when welding on different machines , I explained how to set the wire feed speed on a mig welder by counting off 6 seconds, measuring the wire that was fed to the nearest whole inch, and then adding a zero. That’s your wire speed in inches per minute (ipm).
Why is that important? Because machines are all different.
Most older mig welding machines do not even display inches per minute on the dial.
Yet when you look at a weld setting calculator like the one on Millers website, you see the weld calculator list the wire speed in ipm-inches per minute.
Then you look at your old Millermatic 250 and you don’t see ipm anywhere. All you see is 0-100 and low range and high range.
Then what?
Sure you can get some scrap and fart around for a few minutes with the voltage and wire feed speed and if you are pretty experienced, you will get the machine set pretty close to what it takes to do the job.
But I think my way is better.
Better because measuring the actual wire coming out of the end of the gun does not rely on the knob being calibrated. It does not even matter if there is no knob at all....If you have worked very many jobs, you have probably encountered the machine with no knobs.... You know what I am talking about.
It dont matter to me because I can figure wire speed myself and its all pretty easy to set voltage once I know the wire speed.
To prove it works, I ran this test plate.

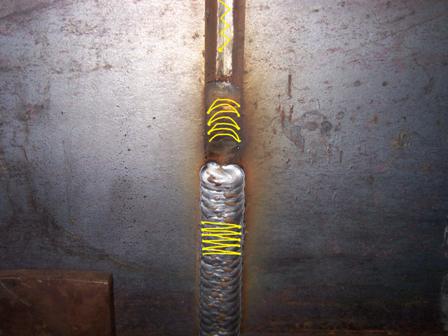
I knew from previous experience that 230 ipm (not on the dial, but actual inches per minute as counted by me) works pretty well for all 3 passes on a 3/8” welding certification test plate like the one pictured.
When I run these MIG welding certification test plates , the root pass is done downhill, then the fill pass is done immediately after the root.
But for the cover pass, its best to let it cool until you can touch it without burning your hand. Still warm is fine...just not smoking hot.
The machine settings stayed the same the whole way out…root, filler, and cover pass.
To get my 230 ipm, I just count off 6 seconds and measure the wire that came out. It usually takes about 3 or 4 tries of adjusting the wire feed speed to get my 23 inches in 6 seconds .
I just Pull the trigger and count Thousand one…thousand two… let off the trigger on Six….and measure….you get the picture.
Once I knew my wire speed , I set the voltage to around 18 and then weld on some scrap. Depending on the mig machine I am using, I usually wind up at about 18-19 volts on the voltage knob and I get there by messing around with what I know is too little and too much voltage.
Too little voltage and the wire stubbed and the puddle quivered.
Too much voltage and the sound of the arc popped and rattled and spattered. Somewhere in the middle of too much and not enough is just right.
Now that the machine is set right, what about mig welding technique?
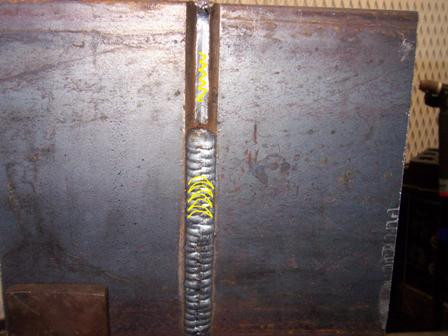
The yellow lines on each picture show one way to manipulate the arc on each pass to achieve a good bead. Notice I said "one way" There are other ways too but read on to learn why I use these mig welding techniques.
The downhill root pass on a joint like this is hard to screw up. Just wiggle the arc from side to side while making sure to keep the arc in the front of the puddle. If you get too far in front, wire will shoot thru and that’s bad. Hang back too far in the puddle and you may not penetrate the edges of the joint.
The second pass is probably the most important. It needs to be flat and about 1/16” below flush.
Not all the way flush and not bulged in the middle. I said flat and about 1/16” below flush.
Look at the yellow line for the second pass and you will see that the arc follows a rainbow pattern.
There is a good reason for that.
It traces the front edge of the puddle.
The front of the puddle is where the rubber meets the road. Tracing the leading edge of the puddle makes sure the arc stays on the leading edge of the puddle and not way back in the puddle .... and that’s a good thing.
If you are able to weld the second pass and have a flat weld that is about 1/16” below flush, putting a good looking cover pass is much easier.
The cover pass technique can be simply a zig zagging and pausing on the sides. Go quickly across the middle and pause on the sides. Pause for like half a second.
Using a slight rainbow motion works just fine here also if you wind up liking that.
Good luck Welder.
exit mig welding certification and go to mig welding techniques
Would you like to get free welding videos in your inbox every week?


Tig FingersThe Real and Original TIG Finger® and XL model
Stubby Gas Lens and Pro TIG kits
2% Lanthanated, CK LaYZr, Purple, more
Our Weldmonger Stubby Gas Lens kit is the Best


 Subscribe To This Site

