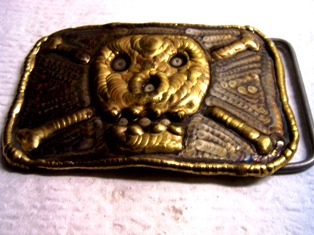
Welding Art - Skull Belt Buckle


"Welding Stainless on A/C? .. "
My youngest son plays guitar in a hard core metal band…the kind where the singer screams and you can’t understand a word he says.
Seriously, he could be saying "peace on earth, good will to men" …or he could be saying "Kill your parents ". I can’t tell. It’s just screaming to me....Really loud screaming.
There have been many evenings when I have been sitting here at my computer writing about welding while getting a hard core butt massage from the loud bass vibes coming from the basement where band practice is happening.
But it's his music. He is my boy…and I love him.
So I made this buckle for him to wear when he plays gigs. It was a risk because a homemade belt buckle from Dad is not exactly the coolest thing for a 22 year old hard core guitar player to talk about.
But I made it anyway. Hopefully it will grow on him.
Wanna know how I made this custom belt buckle?
I started with a small piece of 304 stainless about .063" thick. Thicker would have been better because it wants to warp with all the welding.
I sanded a radius on the corners with a belt sander. and then I put it in a vice and put a slight curve in it
I drew an outline of the skull and crossbones with a pencil and then went over it with a 1/8" carbide burr so I could see it while welding.
I used 1/16" diameter aluminum bronze filler wire to weld the skull and crossbones. Using a Miller Syncrowave 250 set on Alternating current…like for welding aluminum.
Now normally I wouldn’t weld stainless steel on A/C but for using aluminum bronze for welding art, it works really nice and leaves the bronze weld beads with a gold shiny appearance.
Welding it on DCEN comes out dull.
If you have A/C balance or if you are using an A/C DC inverter like a Miller Dynasty 200DX, Lincoln invertec v205t, or an Everlast Tig welder, you would set the A/C balance high. …10 on a syncrowave, or up to 90% on an inverter.
It doesn’t take much heat to flow aluminum or silicon bronze on stainless, so use just enough heat to move the puddle. Its all about looks here,,,not penetration.
I let it cool very often, in fact, I dunked it in a bucket of water every bead or two making sure to leave it warm enough to evaporate all the water so it would be dry when I fired back up.
I didn’t have all day to wait for it to cool off and wasn’t worried what quenching would do the the microstructure.
This is welding art …all that counts is looks.
After I got the skull and crossbones done, I filled in the spaces with weld beads pulsing the foot pedal to leave distinct ripples and not using any filler rod.
Once the front was done, I just made some hardware for the back out of 3/16" tubing and welding rod. I puddled the end of the post with a little ball so it wouldn’t slide out of the belt holes.
There is another good use for aluminum bronze tig welding rod too.
Welding Cast Iron!
I also like to weld cast iron using this rod. I weld cast iron on A/C too and have had great results with parts that wanted to crack when welded using nickel rod.
It seems the aluminum bronze is flexible enough to relax when it cools instead of shrinking and causing cracks in the cast iron around the weld.
Try aluminum bronze tig welding on A/C sometime...either on cast iron or on some welding art...
You will love it.
.
exit welding art page and see welding sculpture
Would you like to get free welding videos in your inbox every week?


Tig FingersThe Real and Original TIG Finger® and XL model
Stubby Gas Lens and Pro TIG kits
2% Lanthanated, CK LaYZr, Purple, more
Our Weldmonger Stubby Gas Lens kit is the Best


 Subscribe To This Site

