MIG Welding MIG Welder Settings and How to MIG Weld Videos
watch video on mig welding for beginners here

You will love this Affordable Little MIG Welder. ( it's also a stick welder)
please take advantage of our Free Guide Books.


- HOME
- MIG WELDING
- Welding Mig Welder
MIG Welding MIG Welder Videos using a Primeweld
MIG180...one of the best affordable mig welders available

I think of my Mig180 mostly as a Great Little MIG Welder with a great arc and nice small mig gun that feels great in my hand... but it also Stick welds, and even comes with a spool gun for aluminum.
just look at all that comes with it... That is a lot of bang for the buck!


MIG Welding-MIG Welder wire speed settings


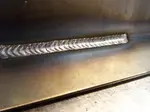
Vertical uphill welding with short circuit MIG, requires a certain amount of manipulation to prevent the weld from being overly convex.
learn more about the MIG 180 at weldmonger.com
What to Look for in an Affordable MIG Welding Machine
Shopping for an affordable MIG welding machine can feel a bit overwhelming—there are tons of options, flashy marketing claims, and tech specs that might not make much sense if you're just starting out.
But here’s the good news: you can find a great MIG welder that’s both budget-friendly and highly capable. You just need to know what to look for.
Whether you’re a hobbyist, DIYer, student, or light-duty fabricator, here’s a breakdown of the most important features and specs to consider when choosing a solid MIG machine without breaking the bank.
1. Power Input – 110V vs. 220V (Or Both)
First things first: check the power input. Most affordable MIG welders run on 110V household outlets, which is super convenient for garages, home shops, and beginners. These are great for light-duty work—think auto body, sheet metal, and up to 1/8" steel. However, if you plan to tackle thicker materials or want more amperage flexibility, a dual-voltage welder (110V/220V) gives you the best of both worlds. Even though dual-voltage machines cost slightly more, the upgrade is worth it if you think you'll outgrow a basic 110V model quickly.
2. Duty Cycle – Don't Ignore This
The duty cycle tells you how long the welder can run before it needs to cool down. For example, a 30% duty cycle at 90 amps means the welder can operate for 3 minutes out of every 10 before needing a break.
Lower-end models often have limited duty cycles, which can be frustrating during longer welds. Look for machines with at least a 30-40% duty cycle at mid-range amps, especially if you plan on using it regularly. Anything better than that at a good price is a major win.
3. Wire Compatibility – Flux-Core vs. MIG with Gas
Many affordable MIG machines are flux-core only, meaning they don’t require shielding gas.
Some economy welders don't even have the option of using shielding gas. While flux-core is fine for outdoor or rough welding, it’s messier and creates more spatter.
A welder that also supports gas-shielded MIG (like solid wire with 75/25 gas) will give you cleaner welds and better arc control, especially on thinner metals....and you will have more options. Ideally, pick a unit that can handle both so you get the flexibility to switch between flux-core and true MIG welding depending on the project.
4. Build Quality and Portability
Even budget welders should feel solid and not like cheap plastic toys. Look for a machine with a durable metal case, good ventilation, and sturdy internal components. A decent wire feed system—metal drive roller carriage over plastic ones—is another major plus. If you plan on moving your welder around the shop or job site, check the weight and handles. Many compact MIG welders under 40 lbs. are easy to carry, and portability becomes a real advantage if space is limited or you’re always working in different areas.
5. Easy-to-Use Controls
Let’s face it—if you’re a beginner, complicated digital menus or ultra-fine adjustments can be intimidating. An affordable MIG welder should be user-friendly with simple dials for voltage, wire speed, and mode selection. Some machines now include synergic controls, which automatically adjust wire feed and voltage based on your input. But basic voltage and wire speed settings are easily learned by watch videos from Jody on weldingtipsandtricks.com
6. Amperage Range and Thickness Capability
Check the welder’s output range to make sure it fits your needs. A machine that goes from 30 to 140 amps, for example, will handle everything from thin sheet metal to 1/4" mild steel in a single pass. If you’re planning on working with anything thicker than that, make sure the machine can either handle it in multiple passes or be upgraded with 220V input and stronger output. Stick to models that include a thickness chart or calculator to help you set up for different materials.
7. Brand Reputation and Warranty
It’s tempting to go for the absolute cheapest machine out there, but don’t ignore brand reliability. Stick with affordable but well-reviewed brands that have built solid reputations and offer real customer support with user groups on Facebook... like Primeweld. A good warranty (ideally 3 years) is also key. You want peace of mind that your investment is covered if something goes wrong.
8. Accessories Included
Don’t overlook what comes in the box. Some affordable machines include a MIG gun, ground clamp, sample spool of wire, a gas regulator, and even a spool gun. Others make you buy everything separately, which drives up the true cost. Make sure you're getting a ready-to-weld package if you’re trying to stay within budget. A few extra accessories—like replacement tips, nozzle gel, or a welding chart—are great bonuses.
An affordable MIG welder doesn’t have to be a wimpy underpowered mig welder.
With the right features—like dual-voltage input, adequate duty cycle, MIG/flux-core support, and reliable build quality—you can get professional results on a DIY budget. Focus on practicality, ease of use, and what kinds of projects you'll be tackling. That way, you’ll choose a machine that grows with your skills and delivers solid performance without burning a hole in your wallet.
The mig welding mig welder settings demonstrated in the videos on this page will work with most any mig welder whether its a small 110-120 volt mig welder, a multi voltage mig welder like the Primeweld mig180, or a larger 220-230volt mig welder.
Provided you are using the same diameter wire and shielding gas as shown in these videos.
There are some limitations with 115 volt mig welders as far as thickness and duty cycle and that is why you might want to consider a dual voltage mig like the mig180 because you can grow into it should you decide to rewire your shop for 220-230v.
You can weld 11ga 1/8" thick steel without a problem using 115 volt power but 230 volt is a much better choice for 1/4" and thicker.
With a Dual voltage mig welder like the mig180, you can use either 115 volt or 230 volt so if you currently only have 115 volt power in your garage or shop, you can upgrade to 230 and use the same welder.
This small welder also has a stick welding function for those outdoor windy jobs... and you can scratch start tig too if you get a cylinder of pure argon and a tig torch with a valve.
Tig torch is not included but that does give you another option for jobs like sanitary stainless.
You might like these
Vertical Uphill Welding Technique
A Video Explaining a Vertical Uphill Welding Technique
The Hobart Trek 180 - The First Cordless Welder with Balls
The Hobart Trek 180 plugs into 115 volt or runs cordless

Would you like to get free welding videos in your inbox every week?


Tig FingersThe Real and Original TIG Finger® and XL model
Stubby Gas Lens and Pro TIG kits
2% Lanthanated, CK LaYZr, Purple, more
Our Weldmonger Stubby Gas Lens kit is the Best


