
Full Penetration on Aluminum Butt Joints
-Tips & Techniques

When it comes to tig welding aluminum, a lot of general aluminum welding involves fillet welds where full penetration on aluminum is not required or even desired... but there are still plenty of applications where full penetration on aluminum is a requirement.
This page and video is about tips for reading the puddle as well as machine settings for full penetration.
There is a reason so many top welders like a #5 cup for getting full penetration on aluminum. learn more at weldmonger.com

This #5 combo kit includes a clear #5 as well as a ceramic #5 cup along with collet body and all the parts needed to fit your torch. We have a kit for #9-20 style torches as well as 17, 18, 26 style .

Cup size and gas flow rate both effect full penetration on aluminum
Cup size matters and gas flow rate is related to cup size.
One reason a lot of welders prefer a standard #5 cup is because the gas flow rate can be set low enough to limit the width of the cleaning action of the arc.
As a general rule of thumb flow rate in CFH should be 2-3 times cup size.
The cleaning action path seems to only go where there is argon shielding and the #5 cup provides a smaller argon shielded area.
I like gas lenses for certain aluminum welds but a standard #5 cup with standard collet body is very useful for certain full penetration aluminum welds.
If flow rate out of the cup is too high, its very difficult to get full penetration on an aluminum butt joint.
This is especially true on a test weld in a chill block fixture.
a #5 cup lets you use only 10-15 cfh argon flow and that seems to help with penetration on butt joints.
You might like these
Dual Shield Flux Core vs 7018 Stick
Video of Dual Shield Flux Core vs 7018 Stick Electrode vertical uphill using an Esab Rebel 285
TIG Welder Settings Videos
TIG Welder Settings for Steels and Aluminum with Quick Videos Showing settings and results
A few examples where full penetration is required
- aluminum ducting for aircraft
- aluminum cold air intakes for automotive
- aerospace test welds and other butt joints.
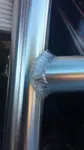
I am mostly referring to butt joints but this could also apply to an outside corner joint…especially when the weld reinforcement is blended off after welding.
(This article primarily applies to single pass aluminum welds from around .020”( 0.5mm) thickness up to around .125” (3.2mm) thick.)
Watching and Reading the Aluminum Weld puddle

I remember way back to when I was in welding school, my instructor was always telling me to “watch the puddle”.
That was very good advice even if he didn’t explain what I was supposed to be watching.
I figured some things out but I am still learning
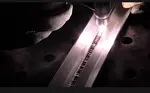
Watching the puddle is one of the main things that tells you whether you are getting full penetration on aluminum butt joints.
What I mean by that is that you want to see the puddle sink a bit in between dabs of filler metal in order to know you are getting full penetration.
This can be subtle but the more your eyes get trained, the more readily you can read the puddle.
What are the things that make the most difference in getting full penetration on aluminum?
- Amperage
- AC frequency settings
- AC balance
- Arc length
- Torch angle
- Chill factor/heat sinks
- Fit up and joint prep
- Cup size and gas flow rate
- Shielding gas
- Travel speed
- Electrode tip geometry
Amperage is one of the main things that makes a big difference and the amperage needed for achieving a full penetration on aluminum is usually somewhat more than what is required for carbon steel.
For example, the 1G .063” (1.6mm) butt joint in this video required a peak of 70 amps whereas that same joint in carbon steel in the same fixture would have probably required only 60 amps for full penetration.
Amperage needed is also affected by whatever chill bars or heat sinks are in use.
The same joint in a fixture with copper chill bars might require more amperage than one welded in free state with no chill bars.
AC frequency settings affect penetration too.
The video on this page demonstrates a weld done at the same travel speed and same amperage but with very different AC frequency settings.
higher frequency settings can help focus the arc but require more amperage if full penetration is the goal.
AC balance is a great feature and definitely affects penetration.
AC balance lets you adjust how much cleaning action is in the arc by adjusting the amount of electrode positive is in the alternating current.
Some machines even list both cleaning and penetration on the knob or button.
Generally speaking, The lower the cleaning setting the more penetration you get. (Its not quite as simple as that but for now that will do)
Arc length is another factor that affects penetration
With aluminum, holding too tight an arc usually results in re prepping electrodes too often.
But too long an arc is not good either.
Aim for an arc length that is roughly equal to your electrode diameter and you should be ok.
Torch angle
Torch angle can be pretty forgiving provided your arc length is tight enough.
When I film welding videos, I sometimes notice that I am using a bit more torch angle than what I think I am.
I believe this is the case with most people.
A torch angle of 10 degrees is a good practice as a general rule of thumb.
Chill factor and heat sinks
Some aluminum test welds are welded in a fixture with chill bars.
This is very common for aerospace test welds and chill bars can help direct heat and help with penetration but only if you use enough amperage.
The material used for chill bars makes a pretty big difference in the amperage needed too.
Steel chill bars remove less heat than copper chill bars.
Shielding gas
Argon is the most common and most versatile shielding gas for aluminum but an argon helium mix can really help with penetration.
Even a slight addition of helium makes a big difference on penetration.
Another popular shielding gas for aluminum is Stargon AL.
Travel speed
Travel speed affects both heat input and penetration.
One mistake I have seen quite a bit is not really travel speed but not waiting long enough before moving the puddle.
Aluminum is very thermally conductive and so soaking the heat for a few seconds before adding filler metal and taking off can help with achieving full penetration.
Fit up and joint prep
Fit up and joint prep are very important in achieving full smooth penetration on the back side of an aluminum butt weld.
If there are oxides, grit, or saw marks, getting smooth penetration on the back side of an aluminum joint can be difficult.
Sometimes all that is required is to clean the edges of a butt joint to make sure it is free from grit, saw marks, plasma dross, or any other surface contamination.
A clean dedicated file that has not be used on other metals works but a de burring tool can also work fine for light cleaning.
For plasma dross, abrasives are sometimes the only way to prep an edge.
It really depends on the application.
For a test weld that gets X rayed, care must be given to not embedding any grit or smearing oxides.

Electrode tip geometry
How you prep the tip of your electrode definitely affects penetration but the shape of your tungsten tip can change quite a bit while you weld.
This is also affected by the type of tungsten you use as well as the welding machine and settings.
I personally prefer 2% lanthanated tungsten as an all around choice for both AC and DC tig welding.
I start out most welds with a tapered tip that I have rounded slightly on purpose using an AC balance setting with a lot of cleaning (electrode positive).
On thicker aluminum, I prefer to round the tip more so that it stays the same for the entire weld.

You might like these
Welding anodized aluminum tips
Welding anodized aluminum is what everyone wants to learn
Mig Welding Aluminum with a Spool Gun
Mig Welding Aluminum - Aluminum Mig Welding Techniques
How to TIG weld Aluminum Boxes
This Video shows How to Tig weld aluminum boxes outside and inside corners with great arc shots

Would you like to get free welding videos in your inbox every week?


Tig FingersThe Real and Original TIG Finger® and XL model
Stubby Gas Lens and Pro TIG kits
2% Lanthanated, CK LaYZr, Purple, more
Our Weldmonger Stubby Gas Lens kit is the Best


