Take advantage of our Free Welding Guides loaded with Video links

How to TIG weld Aluminum lap joints
- HOME
- TIG WELDING ALUMINUM
- How to Tig Aluminum
- How to Tig Weld Aluminum Lap Joints

- HOME
- TIG WELDING ALUMINUM
- How to Tig Aluminum
- How to Tig Weld Aluminum Lap Joints
There are several techniques that will work for learning how to tig weld aluminum lap joints.
This first video shows my friend and welderskills.com instructor Brad Goodman pulsing with the foot pedal on a PrimeWeld TIG225x machine with a #5 gas lens
Learn more about this affordable tig welder with bonus kit at weldmonger.com

Watch the Best "Back to Basics" Video on TIG Welding Aluminum. click here
This video shows a conventional technique using a foot pedal
- HOME
- TIG WELDING ALUMINUM
- How to Tig Aluminum
- How to Tig Weld Aluminum Lap Joints
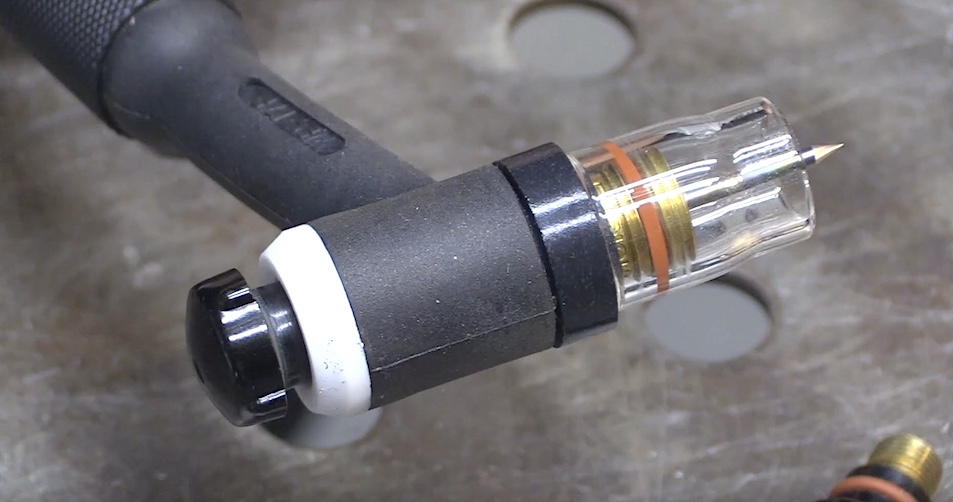
I used a #8 pro clear cup for filming this video and it really lights up the area and helps me see the weld area better

Here's a step-by-step guide on how to TIG weld aluminum lap joints:
- Equipment and Materials: You will need a TIG welding machine with AC (alternating current) capability, Tungsten electrode (some good choices for tig welding aluminum are 2% lanthanated, LayZr, and E3) , Aluminum filler rod (compatible with the base aluminum material...here is a great chart for selecting aluminum filler metal )Gas cylinder with pure argon and regulator flowmeter. A water cooled torch and cooler is helpful for thicker aluminum but you can definitely get started learning how to tig weld aluminum with an air cooled torch setup.
- Prepare the aluminum for welding: I know there is an old adage that the 3 Cs of aluminum are 1.clean, 2.clean, and 3.clean...but sometimes a simple wipe down with acetone is all that is needed prior to tig welding. I mean Aluminum sheets sometimes have a peel coat and are clean enough to weld... Other times a stainless wire brush followed by acetone wipe is needed. And if the aluminum has been stored outside for a time or if it has been in service like a pontoon boat or something, you might need to clean with a flap disc or other abrasive before welding.
- Set up the TIG welding machine: Set the machine to AC mode, since aluminum requires alternating current for welding. Make sure the tig torch is connected to the correct port. Newer tig welders often have a tig torch icon displayed where the tig torch connects. TIG Machines are all somewhat different but in my experience, 99.9% of them are designed where the tig torch connects to the negative terminal or dinse plug.
- Adjust the Settings:Select the appropriate amperage setting based on the thickness of the aluminum. Up to around .120" thick 1.5 amps per thousandths of thickness will get you close enough if you are using a foot pedal amperage control. For brand new clean aluminum that has not been stored outside, set the balance control to around 70% electrode negative (EN) and 30% electrode positive (EP).Adjust the frequency to a medium range (around 100-120 Hz) for better control and narrower weld bead. Some older tig welding machines don't have AC balance or AC frequency settings and are fixed at 50 or 60hz frequency and around 67% EN but they still weld fine.
- Start the welding process:Position the TIG torch at a slight angle (around 10-15 degrees) to the joint, with the tungsten electrode pointing in the direction of travel. With the tip of the electrode only around 1/8" from the metal, (this 1/8" arc length will help with crisper arc starts) ...press the foot pedal or lightly move the finger amperage control to start the arc. Increase amperage steadily until you see a frosty area. Don't add filler rod yet. Increase amperage until you see a shiny molten puddle. Dont add filler metal until you see the shiny aluminum puddle. If the puddle is not shiny but shows trash floating around, either clean the metal more, increase argon flow rate, or adjust AC balance for more cleaning...you might need to do all 3.
- Add filler metal: 4043 is one of the most versatile filler rods for aluminum but 5356 or others will do for practice. After the puddle is the right size (usually about 3-4 times your electrode diameter) Dip the aluminum filler rod into the molten puddle . Don't cram it in but don't add it too slowly either or the tip of the filler rod will melt and ball up before reaching the puddle. Add the filler metal by feeding it into the joint as needed about once per second and in between each dip, move the torch ahead approximately 1/8". The way to get a uniform bead is to add the same amount of filler rod each dip and also move the torch ahead the same distance in between each dip. Try to establish a rhythm so that you will get a consistent and uniform weld bead. Concentrate on keeping your arc length and torch angle consistent. ( arc length is the distance between the tip of the tungsten and the puddle and it should be no more the the diameter of the tungsten you are using in most cases)
- Continue welding: Move the TIG torch along the joint, melting the base material and adding filler metal.Maintain a steady travel speed, adjusting the amperage and filler metal accordingly to achieve a proper weld pool and penetration.
- Finish the weld:At the end of the weld bead, gradually reduce the amperage as you add less and less filler metal until there is no more molten puddle.
- There are many techniques that can work here but when you are trying to learn how to tig weld aluminum lap joints, try the technique in described here and shown in the video first....then you might try moving on to other techniques like pulsing with the foot pedal or using the pulse settings on your tig welder if it has pulse.
How to TIG weld thin aluminum lap joints

How to TIG weld Aluminum Butt and Tee joints


You might like these
Aluminum Welding Training on your own - just you and your tig machine
The best Aluminum Welding Training you can get on your own - How to Get better at Tig Welding
Welding Aluminum with Tig
Videos on Tig Welding Aluminum and learning how to tig weld

Would you like to get free welding videos in your inbox every week?


Tig FingersThe Real and Original TIG Finger® and XL model
Stubby Gas Lens and Pro TIG kits
2% Lanthanated, CK LaYZr, Purple, more
Our Weldmonger Stubby Gas Lens kit is the Best


