Take advantage of our Free Welding Guides loaded with Video links

3/32" 7018 welding

Basics of 3/32" 7018 Welding
- HOME
- STICK WELDING
- 3 32 7018
3/32 7018 stick rods are a favorite for a lot of welders who do portable welding.
- The puddle is easier to control for overhead and vertical welds
- 3/32" 7018 can often be run using a small 115 volt inverter welder
- 3/32" 7018 are readily available at both welding supply stores, and big box stores in 10 lb containers
Stick Welding overhead in 4f position using 3/32" 7018 rods at 87 amps on 115 volt power
Watch the latest welding videos at Weldmonger.com
More Overhead Welding with 3/32" 7018

- HOME
- STICK WELDING
- 3 32 7018
Why use low hydrogen 7018 electrodes? Watch video on hydrogen embrittlement
Simple metallurgy of welding carbon steels

Understanding the Overhead Welding Position
Overhead welding with 3/32" 7018 isn’t quite as simple as just welding upside down. But once you get the hang of it, you might just think it is just the same welding flat on the bench.
You’re dealing with molten metal, gravity, and limited visibility, all while trying to keep your arc steady and your puddle under control.
Dont be timid and set the amperage low thinking that will keep the puddle from sagging.
Set the amperage hot enough where you can hold a tight arc length without the rod sticking...Then hold a tight arc and things will go better.
In overhead welding (also known as the 4G position for groove welds or 4F for fillet welds), the workpiece is above your head, and you're welding on the underside. This means the molten metal has a tendency to sag.
But the right amperage and a tight arc goes a long way in preventing the puddle from sagging.
It takes practice, right amperage and polarity, and a tight arc length, to prevent drips, undercutting, and incomplete fusion. A steady hand and a solid understanding of how the weld puddle behaves are helpful.
Positioning your body is also a big part of the game. You shouldn't just stand directly under the weld—that’s a recipe for burns and frustration. Instead, position yourself at a slight angle so you can see the joint without being directly beneath it.
Proper PPE (Personal Protective Equipment) becomes important here—think flame-resistant clothing, a reliable welding helmet with the right shade, gloves, and sometimes even a leather jacket and hat.
Mastering overhead welding requires understanding the flow of the puddle, adjusting travel speed, and using the right electrode angle. With 3/32 7018 rods, you’ll want to maintain a tight arc, slight drag angle, and steady motion to keep the bead from sagging.
Welding Machine Settings for 7018 Electrodes
Welding Machine and polarity Settings for 7018 Electrodes
Welding isn’t just about striking an arc—it’s also about dialing in your equipment to match the job.
With 7018 electrodes, especially the 3/32 size, machine settings can make a big difference. Whether you're using a transformer or inverter machine, DC+ (Direct Current Electrode Positive) is your best bet with 7018 rods.
Some machines have the electrode positive polarity labeled as "Reverse Polarity" but most modern machines will either have a plus sign "+" or "positive" or both.
Some welding machines have a switch for polarity, Some require switching leads to where the electrode lead is connected to the positive + connection...while newer inverter multiprocess MTS (MIG, TIG, STICK) welders often have a pigtail that needs to be connected to the positive dinse port.
There is a difference in the sound of the arc when you weld on DCEN vs DCEP and it is good to know the difference.
DCEP aka Reverse Polarity setting provides deeper penetration and a smoother arc.
For 3/32-inch 7018 rods, you’ll typically want your amperage set between 75 and 100 amps. The sweet spot depends on your technique and the material you’re welding. If you're just starting out, aim for the middle—around 85 amps—and adjust from there. Too low, and you’ll struggle to maintain an arc; too high, and the puddle will get too hot, too fast, making it hard to control overhead.
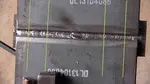
It is never a bad idea to test on a scrap piece before starting the actual weld.
Pay attention to arc stability, bead profile, and spatter. A smooth, steady arc with minimal noise is what you’re after.
Proper settings mean smoother arcs, better penetration, and less cleanup later. Take the time to get it right.
You might like these
Stick Welding TEst
10 Quick Simple Tips for Passing a Stick Welding TEst
Horizontal Weld Test 7018 with backing
A video of a 2g horizontal weld test using a 1/8" 7018 rod and backing strap
Would you like to get free welding videos in your inbox every week?


Tig FingersThe Real and Original TIG Finger® and XL model
Stubby Gas Lens and Pro TIG kits
2% Lanthanated, CK LaYZr, Purple, more
Our Weldmonger Stubby Gas Lens kit is the Best


